0%

Python基础知识

实现TPS62873电压配置

1
2
3
4
5
6
7
8
9
10
11
12
13
14
15
16
17
18
19
20
21
22
23
24
25
26
27
28
29
30
31
import sys
import os

name = sys.argv[1]
if name == 'CPU':
i2caddr='0x40'
else:
i2caddr='0x43'

vout = sys.argv[2]
vout_mv = float(vout) * 1000 - 400
Rvset = hex(int(vout_mv / 2.5 + 0.5))

print("%s"%Rvset)
os.system("i2ctransfer -f -y 3 w2@%s 0x02 0x05"%i2caddr)
result=os.popen("i2ctransfer -f -y 3 w1@%s 0x02 r1"%i2caddr).read().replace("\n", "")
if result != '0x05':
print("i2c write failed")
else:
print("i2c write 0x02 ok")

print(result)

os.system("i2ctransfer -f -y 3 w2@%s 0x00 %s"%(i2caddr,Rvset))
result=os.popen("i2ctransfer -f -y 3 w1@%s 0x00 r1"%i2caddr).read().replace("\n", "")
if result != Rvset:
print("i2c write failed")
else:
print("i2c write 0x00 ok")

print(result)

实现json数据整理到Excel

1
2
3
4
5
6
7
8
9
10
11
12
13
14
15
16
17
18
19
20
21
22
23
24
25
26
27
28
29
30
31
32
33
34
35
36
37
38
39
40
41
42
43
44
45
46
47
48
49
50
51
52
53
54
55
56
57
58
59
60
61
62
63
64
65
66
67
68
69
70
71
72
73
import os
import json
import pandas as pd
import pandas as pd
import numpy as np
from openpyxl.utils import get_column_letter
from pandas import ExcelWriter
from datetime import datetime


def to_excel_auto_column_weight(df: pd.DataFrame, writer: ExcelWriter, sheet_name="Shee1"):
"""DataFrame保存为excel并自动设置列宽"""
# 数据 to 写入器,并指定sheet名称
df.to_excel(writer, sheet_name=sheet_name, index=False)
# 计算每列表头的字符宽度
column_widths = (
df.columns.to_series().apply(lambda x: len(str(x).encode('gbk'))).values
)
# 计算每列的最大字符宽度
max_widths = (
df.astype(str).applymap(lambda x: len(str(x).encode('gbk'))).agg(max).values
)
# 取前两者中每列的最大宽度
widths = np.max([column_widths, max_widths], axis=0)
# 指定sheet,设置该sheet的每列列宽
worksheet = writer.sheets[sheet_name]
for i, width in enumerate(widths, 1):
# openpyxl引擎设置字符宽度时会缩水0.5左右个字符,所以干脆+2使左右都空出一个字宽。
worksheet.column_dimensions[get_column_letter(i)].width = width + 2

DIR='./data/report'

header = ['PlanId', '测试板编号', 'IP地址', 'SN', '板子状态', '测试耗时', 'NovaOs版本', '失败模块', '测试结果']

DataList = []

for root, dirs, files in os.walk(DIR):
for name in dirs:
sub_dir = os.path.join(root, name)
file = sub_dir + '/' + "result.json"
if os.path.exists(file):
with open(file, 'r') as f:
data = json.load(f)
serial = data['board_results'][-1]['board']['serial']
ip = data['board_results'][-1]['board']['ip']
sn = data['board_results'][-1]['board']['sn']
board_status = data['board_results'][-1]['board_status']
test_duration = data['board_results'][-1]['test_duration']
test_result = data['board_results'][-1]['test_result']
version = data['board_results'][-1]['version']
failed_features = data['board_results'][-1]['failed_features']
row=[name, serial, ip, sn, board_status, test_duration, version, failed_features, test_result]
DataList.append(row)
df = pd.DataFrame(DataList, columns=header)

df.style.set_properties(**{'text-align': 'center'}).set_table_styles([ dict(selector='th', props=[('text-align', 'center')])])

#print(df['IP地址'].unique())
writer = pd.ExcelWriter('report.xlsx')
for i in df['IP地址'].unique():
#df[df['IP地址'] == i].to_excel(writer, sheet_name=i, index=False)
tmpData=df[df['IP地址'] == i]
to_excel_auto_column_weight(tmpData, writer, i)

writer.close()

now = datetime.now()
time = now.strftime("%Y-%m-%d-%H_%M_%S")

os.system(f"sudo tar zcvf {time}_report.tar.gz /home/slt-racetrack-server/data/ ./report.xlsx")
os.system("sudo rm -rf /home/slt-racetrack-server/data/*")
os.system("sudo rm -rf ./report.xlsx")

实现json数据整理为特定格式的Excel

截取的部分代码

1
2
3
4
5
6
7
8
9
10
11
12
13
14
15
16
17
18
19
20
21
22
23
24
25
26
27
28
29
30
31
32
33
34
35
36
37
38
39
40
41
42
43
44
45
46
47
48
49
50
51
52
53
54
55
56
57
58
59
60
61
62
63
64
65
66
67
68
69
70
71
directory_path = str(self.test_result_root/ '..' / '..' / 'report')
dir_list = os.listdir(directory_path)

self.logger.debug('%s'%dir_list)
#获取以“report+时间”命名的report目录
for item in dir_list:
full_path = os.path.join(directory_path, item)
if self.is_directory(full_path) and item.startswith("report_"):
self.logger.debug('%s'%full_path)
break

workbook = load_workbook(f"{full_path}/report.xlsx")
worksheet = workbook["模板"]
#填充表单的基本信息
newsheet = workbook.copy_worksheet(worksheet)
newsheet['B2'] = test_plan.server_msg[0].serial
newsheet['D2'] = test_plan.server_msg[0].ip
newsheet['F2'] = test_plan.server_msg[0].sn
newsheet['B4'] = plan_id
newsheet['D4'] = board_result.test_duration
newsheet['F4'] = test_plan.tester
newsheet['B6'] = board_result.version
if board_result.test_result == 'FAIL':
newsheet['F6'] = 'FAIL'
else:
newsheet['F6'] = 'PASS'

#以planid和sn码命名表单名称
newsheet.title = str(test_plan.server_msg[0].sn + '_' + plan_id)

yamlfile = str(self.test_result_root/ '..' / 'yaml' /test_plan.server_msg[0].ip) + '.yaml'

self.logger.debug('%s'%yamlfile)
with open(yamlfile, 'r') as file:
data = yaml.safe_load(file)

#拷贝测试的log目录,方便后期打包
os.system("cp -r %s %s"%(board_result.test_report,full_path))

#根据测试方案,制作测试项列表
test_items = data['msg'][1].get('test_items', [])
for index, item in enumerate(test_items):
itemname = item.get('name')
newsheet[ f'A%d'%(index + 9)] = itemname
newsheet[ f'C%d'%(index + 9)] = item.get('times')
#截取item中的test之后的字符串
start_index = itemname.find("test") + len("test")
end_index = len(itemname)
substring = itemname[start_index:end_index]

result_field = 'none'

#遍历log目录中item的log文件是否存在,存在则截取pass或failure字段,反之则为NONE
for root, dirs, files in os.walk(board_result.test_report):
for file in files:
if re.search(substring, file, re.I) != None:
filename = os.path.join(root, file)
start_index = filename.rfind('_') + 1
end_index = filename.find('.', start_index)
result_field = filename[start_index:end_index]
if result_field == 'failure':
newsheet[ f'E%d'%(index + 9)] = "FAIL"
break
elif result_field == 'pass':
newsheet[ f'E%d'%(index + 9)] = "PASS"

if result_field == 'none':
newsheet[ f'E%d'%(index + 9)] = "NONE"

#保存添加的sheet表
workbook.save(f"{full_path}/report.xlsx")

Python3数据分析图表的绘制

1
2
3
4
5
6
7
8
9
10
11
12
13
14
15
16
17
18
19
20
21
22
23
24
25
26
27
28
29
30
31
32
33
34
35
36
37
38
import numpy as np  
import matplotlib.pyplot as plt

x = []

y1 = []
y2 = []
y3 = []

for outVol in range(500, 800, 3):
tempVol = outVol - 400
rset1=hex(int(tempVol / 2.5))
rset2=hex(round(tempVol / 2.5))

int_rset1 = int(rset1, 16)
int_rset2 = int(rset2, 16)
outT1=outVol - (int_rset1 * 2.5 + 400)
outT2=outVol - (int_rset2 * 2.5 + 400)
y1.append(outT1)
y2.append(0)
y3.append(outT2)
x.append(outVol)


plt.figure()

plt.plot(x, y1)
plt.plot(x, y2)
plt.plot(x, y3)

# 添加标题和坐标轴标签
plt.title('Modulo-round')
plt.xlabel('Output Voltage')
plt.ylabel('Voltage deviation')

# 显示图形
#plt.show()
plt.savefig('output.png')

简介

GPIO是一种灵活的软件控制数字信号。通用可操作的功能:

  • 输出功能
  • 输入功能
  • 中断功能

在GPIO子系统中,有两种不同的方式来获取和使用gpio:

  • The descriptor-based interface:gpio操作的首选方式。

  • The legacy integer-based interface:已弃用(但出于兼容性原因仍然可用),参见:gpio legacy.txt文档

关键词

  • Open Drain:

    CMOS CONFIGURATION   
            ||--- out          
     in ----||                  
            ||--+        
                |              
               GND	          
    
    • 在Open Drain配置中,晶体管(或逻辑门)仅在其输出端驱动低电平信号(通常是0V或接近0V的电压)。当晶体管或逻辑门不驱动时,输出端处于高阻态(即“悬浮”或“未连接”状态),不会主动拉高或拉低信号线。
    • 为了确保信号线在晶体管不驱动时具有确定的状态,通常会连接一个上拉电阻(pullup resistor)到电源正极(如VCC)。当没有设备驱动信号线为低电平时,上拉电阻会将信号线拉高至高电平状态。
  • Open Source:

    1
    2
    3
    4
    5
    6
    TTL CONFIGURATION
    +--- out
    |/
    in ----|
    |\
    GND

GPIO子系统

驱动结构

名称 说明 备注
devres.c managed gpio resources
gpiolib-devprop.c Device property helpers for GPIO chips
gpiolib-of.c OF helpers for the GPIO API
gpio-syscon.c YSCON GPIO driver
gpiolib-legacy.c
gpiolib-sysfs.c 入口sys节点的创建
gpio-useri.c 控制器驱动
gpiolib.c gpiolib库
gpio-mmio.c Generic driver for memory-mapped GPIO controllers

Pinctrl子系统

参见文档:

[pinctrl文档]: https://www.kernel.org/doc/html/latest/driver-api/pin-control.html?highlight=pinctrl “文档”

驱动注册

1
2
3
4
5
6
7
8
9
10
11
12
13
14
15
16
17
18
19
20
21
22
23
24
25
26
27
28
29
30
31
32
33
34
35
36
37
38
39
40
41
42
43
44
45
46
47
48
49
50
51
52
53
54
55
56
57
58
59
60
61
62
63
64
65
66
67
68
69
70
71
72
73
int driver_register(struct device_driver *drv)
{
int ret;
struct device_driver *other;

BUG_ON(!drv->bus->p);

if ((drv->bus->probe && drv->probe) ||
(drv->bus->remove && drv->remove) ||
(drv->bus->shutdown && drv->shutdown))
printk(KERN_WARNING "Driver '%s' needs updating - please use "
"bus_type methods\n", drv->name);

other = driver_find(drv->name, drv->bus);
if (other) {
printk(KERN_ERR "Error: Driver '%s' is already registered, "
"aborting...\n", drv->name);
return -EBUSY;
}

ret = bus_add_driver(drv);
if (ret)
return ret;
ret = driver_add_groups(drv, drv->groups);
if (ret) {
bus_remove_driver(drv);
return ret;
}
kobject_uevent(&drv->p->kobj, KOBJ_ADD);

return ret;
}
EXPORT_SYMBOL_GPL(driver_register);

static int __driver_attach(struct device *dev, void *data)
{
struct device_driver *drv = data;
int ret;

/*
* Lock device and try to bind to it. We drop the error
* here and always return 0, because we need to keep trying
* to bind to devices and some drivers will return an error
* simply if it didn't support the device.
*
* driver_probe_device() will spit a warning if there
* is an error.
*/

ret = driver_match_device(drv, dev);
if (ret == 0) {
/* no match */
return 0;
} else if (ret == -EPROBE_DEFER) {
dev_dbg(dev, "Device match requests probe deferral\n");
driver_deferred_probe_add(dev);
} else if (ret < 0) {
dev_dbg(dev, "Bus failed to match device: %d", ret);
return ret;
} /* ret > 0 means positive match */

if (dev->parent) /* Needed for USB */
device_lock(dev->parent);
device_lock(dev);
if (!dev->driver)
driver_probe_device(drv, dev);
device_unlock(dev);
if (dev->parent)
device_unlock(dev->parent);

return 0;
}

  • 问题1
1
2
3
4
5
6
7
8
9
10
11
12
13
14
15
16
17
18
error: cannot convert ‘std::__cxx11::basic_string<char>::iterator’ {aka ‘__gnu_cxx::__normal_iterator<char*, std::__cxx11::basic_string<char> >’} to ‘const char*’
29 | FileNameNoTag.erase(std::remove(FileNameNoTag.begin(), FileNameNoTag.end(), ':'), FileNameNoTag.end());
| ~~~~~~~~~~~~~~~~~~~^~
| |
| std::__cxx11::basic_string<char>::iterator {aka __gnu_cxx::__normal_iterator<char*, std::__cxx11::basic_string<char> >}
In file included from /usr/include/c++/9/cstdio:42,
from /usr/include/c++/9/ext/string_conversions.h:43,
from /usr/include/c++/9/bits/basic_string.h:6496,
from /usr/include/c++/9/string:55,
from /usr/include/c++/9/bits/locale_classes.h:40,
from /usr/include/c++/9/bits/ios_base.h:41,
from /usr/include/c++/9/ios:42,
from /usr/include/c++/9/ostream:38,
from /usr/include/c++/9/iostream:39,
from 2.cpp:2:
/usr/include/stdio.h:146:32: note: initializing argument 1 of ‘int remove(const char*)’
146 | extern int remove (const char *__filename) __THROW;
| ~~~~~~~~~~~~^~~~~~~~~~

问题2:

1
2
3
4
5
6
7
8
9
10
11
12
13
14
15
16
17
18
19
20
21
22
23
24
25
26
27
28
29
30
31
32
33
34
35
36
37
38
39
40
41
42
43
44
45
46
47
In file included from ../drivers/media/i2c/useruto/imx390.c:19:
../include/linux/module.h:137:7: warning: ‘cleanup_module’ specifies less restrictive attribute than its target ‘imx390_serdes_driver_exit’: ‘cold’ [-Wmissing-attributes]
137 | void cleanup_module(void) __attribute__((alias(#exitfn)));
| ^~~~~~~~~~~~~~
../include/linux/device.h:1509:1: note: in expansion of macro ‘module_exit’
1509 | module_exit(__driver##_exit);
| ^~~~~~~~~~~
../include/linux/i2c.h:780:2: note: in expansion of macro ‘module_driver’
780 | module_driver(__i2c_driver, i2c_add_driver, \
| ^~~~~~~~~~~~~
../drivers/media/i2c/useruto/imx390.c:104:1: note: in expansion of macro ‘module_i2c_driver’
104 | module_i2c_driver(imx390_serdes_driver);
| ^~~~~~~~~~~~~~~~~
In file included from ../drivers/media/i2c/useruto/imx390.c:18:
../drivers/media/i2c/useruto/imx390.c:104:19: note: ‘cleanup_module’ target declared here
104 | module_i2c_driver(imx390_serdes_driver);
| ^~~~~~~~~~~~~~~~~~~~
../include/linux/device.h:1505:20: note: in definition of macro ‘module_driver’
1505 | static void __exit __driver##_exit(void) \
| ^~~~~~~~
../drivers/media/i2c/useruto/imx390.c:104:1: note: in expansion of macro ‘module_i2c_driver’
104 | module_i2c_driver(imx390_serdes_driver);
| ^~~~~~~~~~~~~~~~~
In file included from ../drivers/media/i2c/useruto/imx390.c:19:
../include/linux/module.h:131:6: warning: ‘init_module’ specifies less restrictive attribute than its target ‘imx390_serdes_driver_init’: ‘cold’ [-Wmissing-attributes]
131 | int init_module(void) __attribute__((alias(#initfn)));
| ^~~~~~~~~~~
../include/linux/device.h:1504:1: note: in expansion of macro ‘module_init’
1504 | module_init(__driver##_init); \
| ^~~~~~~~~~~
../include/linux/i2c.h:780:2: note: in expansion of macro ‘module_driver’
780 | module_driver(__i2c_driver, i2c_add_driver, \
| ^~~~~~~~~~~~~
../drivers/media/i2c/useruto/imx390.c:104:1: note: in expansion of macro ‘module_i2c_driver’
104 | module_i2c_driver(imx390_serdes_driver);
| ^~~~~~~~~~~~~~~~~
In file included from ../drivers/media/i2c/useruto/imx390.c:18:
../drivers/media/i2c/useruto/imx390.c:104:19: note: ‘init_module’ target declared here
104 | module_i2c_driver(imx390_serdes_driver);
| ^~~~~~~~~~~~~~~~~~~~
../include/linux/device.h:1500:19: note: in definition of macro ‘module_driver’
1500 | static int __init __driver##_init(void) \
| ^~~~~~~~
../drivers/media/i2c/useruto/imx390.c:104:1: note: in expansion of macro ‘module_i2c_driver’
104 | module_i2c_driver(imx390_serdes_driver);
| ^~~~~~~~~~~~~~~~~

修改.gitignore文件方法

1
2
3
4
git rm -r  --cache 要忽略的文件
git add .
git commit -m 'update .gitignore'
git push -u origin master

修改commit的历史信息方法

情况一:修改最近一次commit的信息

  1. 使用git commit –amend进入命令模式修改信息
  2. ^O对应的快捷键 “ Ctrl + ‘O’ “
  3. M-D对应的快捷键 “ ALT + ‘D’ ”

情况二:修改最近更早些的commit的信息

  1. 使用git log命令查找要修改的commit信息

  2. 使用git rebase -i HEAD~N显示要修改的信息, N表示最近的n个commit,结果如下:

    1
    2
    3
    4
    5
    6
    7
    8
    9
    10
    11
    12
    13
    14
    15
    16
    17
    18
    19
    20
    21
    22
    23
    24
    25
    26
    27
    28
    29
    pick 27be481ff feat(ne101): SSBSP-998: Create the ne101 project
    pick 679632f15 fix(bug):SSBSP-1018:modify dr mode

    # 变基 27be481ff..584136761 到 27be481ff(2 个提交)
    #
    # 命令:
    # p, pick <提交> = 使用提交
    # r, reword <提交> = 使用提交,但修改提交说明
    # e, edit <提交> = 使用提交,进入 shell 以便进行提交修补
    # s, squash <提交> = 使用提交,但融合到前一个提交
    # f, fixup <提交> = 类似于 "squash",但丢弃提交说明日志
    # x, exec <命令> = 使用 shell 运行命令(此行剩余部分)
    # b, break = 在此处停止(使用 'git rebase --continue' 继续变基)
    # d, drop <提交> = 删除提交
    # l, label <label> = 为当前 HEAD 打上标记
    # t, reset <label> = 重置 HEAD 到该标记
    # m, merge [-C <commit> | -c <commit>] <label> [# <oneline>]
    # . 创建一个合并提交,并使用原始的合并提交说明(如果没有指定
    # . 原始提交,使用注释部分的 oneline 作为提交说明)。使用
    # . -c <提交> 可以编辑提交说明。
    #
    # 可以对这些行重新排序,将从上至下执行。
    #
    # 如果您在这里删除一行,对应的提交将会丢失。
    #
    # 然而,如果您删除全部内容,变基操作将会终止。
    #
    # 注意空提交已被注释掉

    注:这里显示pick的顺序是最早的提交显示在上面

  3. 这里要不要修改的commit对应的pick改为edit或者e,退出保存。

    1
    2
    edit 27be481ff feat(ne101): SSBSP-998: Create the ne101 project
    pick 679632f15 fix(bug):SSBSP-1018:modify dr mode
  4. 这里会提示你使用git commit –amend修改信息,改完之后使用git rebase –continue完成

    1
    2
    3
    4
    5
    6
    7
    8
    9
    nova2021@nova2021-ThinkStation-K-C2:~/work/ne100_r1$ git rebase -i HEAD~3
    停止在 27be481ff... feat(ne101): SSBSP-998: Create the ne101 project
    您现在可以修补这个提交,使用

    git commit --amend

    当您对变更感到满意,执行

    git rebase --continue
  5. 使用git push命令将修改提交到远端,如果push中提示下列信息,则执行git push -f origin SSBSP-998(不推荐)

    1
    2
    3
    4
    5
    6
    7
    8
    git push origin SSBSP-998
    提示下列信息:
    To 192.168.3.224:ne100-embedded-dev/ne100_r1.git
    ! [rejected] SSBSP-998 -> SSBSP-998 (non-fast-forward)
    error: 无法推送一些引用到 'git@192.168.3.224:ne100-embedded-dev/ne100_r1.git'
    提示:更新被拒绝,因为您当前分支的最新提交落后于其对应的远程分支。
    提示:再次推送前,先与远程变更合并(如 'git pull ...')。详见
    提示:'git push --help' 中的 'Note about fast-forwards' 小节。
  6. 网上也推荐使用下列操作解决上述问题, 但没有实测

    1
    2
    git fetch origin  
    git rebase origin/SSBSP-998

更新远端分支的代码修改方法

  1. 追踪远程分支
1
git checkout -b dev902 origin/SSBSP-902-merge
  1. 更新代码的修改

  2. git add “修改的文件”

  3. git commit -m “xxxx”

  4. git push origin HEAD:SSBSP-902-merge(在git中,HEAD是一个特殊的指针,它通常指向当前检出的分支的最新提交。HEAD可以被视为一个移动的标签,它始终指向当前所在的提交)

fps = frames per second
bpp = bits per pixel

加串器max96712

1. mipi时钟,lane数和PCLK的关系

1
MIPI_CLK x LANE_CNT = PCLK x BPP

例如:24-bit RGB, 4 lanes, 1GHz Mipi clock, 则PCLK为166.667MHz
备注:GMSL1模式下PCLK限制到150MHz

  • 正常模式:
  • 默认模式:
    video-link:需要一个有效的PCLK才能进行操作
    在序列化器中设置AUTO_CLINK位=1和SEREN = 1,这样当没有PCLK存在时,设备就会在视频链接和配置链接之间自动切换

解串器max96712寄存器

1. VPRBS寄存器

  • PATGEN_CLK_SRC: Pattern generator clock source for video PRBS7, PRBS9, PRBS24, checkerboard, and gradient patterns. 0=150MHz, 1=375MHz (default)
  • VIDEO_LOCK: Video channel is locked and outputting valid video data

2. BACKTOP22寄存器

  • n_vs_block: Frame block: Block the first 1-15 frames after video lock

3. FSYNC_16寄存器

  • FSYNC_ERR_CNT: Frame Sync Error Counter (resets to 0 when read or when FSYNC_LOCKED (0x4b6) goes high)

4. INTR7(0x2A)

0x01–>FSYNC_ERR_FLAG

[BIT1] :REM_ERR_FLAG: Receives remote side error status (inverse of remote side ERRB pin level)

[BIT0] :FSYNC_ERR_FLAG: Frame Sync Error Flag, FSYNC_ERR_CNT(00x4b0) >= FSYNC_ERR_THR(0x4B1)

5. VIDEO_RX8(0x108,0x11A,0x12C,0x13E,0x150,0x168,0x17A,0x18C)

重点:关注此寄存器,监测mipi数据状态(0x62)

[BIT7] :VID_BLK_LEN_ERR: Video Rx block length error detected

[BIT6] :VID_LOCK: Video pipeline locked 0b0: video pipeline not locked 0b1:video pipeline locked

[BIT5] :VID_PKT_EDT: Video Rx sufficient packet throughput detection 0b0: insufficient packet throughput 0b1: Sufficient packer throughput

[BIT4] : VID_SEQ_ERR: Video Rx sequence error detection. 0b0: No video Rx sequence error detected 0b1: Video Rx sequence error detected

6. VPRBS(0x1DC, 0x1FC, 0x21C, 0x23C,0x27C,0x29C,0x2DC)

重点:此寄存器监测video channel的lock状态(0x81)

[BIT 0] :VIDEO_LOCK: Video channel is locker and outputing vailid video data. 0b0: Video channel is not locked 0b1: Video channel is locked.

7. BACKTOP1(0x400)

[BIT7] :CSIPLL3_LOCK: CSIPLL3 lock 0b0: PLL not locked 0b1: PLL locked

[BIT6] :CSIPLL2_LOCK: CSIPLL2 lock 0b0: PLL not locked 0b1: PLL locked

[BIT5] :CSIPLL1_LOCK: CSIPLL1 lock 0b0: PLL not locked 0b1: PLL locked

[BIT4] :CSIPLL2_LOCK: CSIPLL0 lock 0b0: CSI2 0 PLL not locked 0b1: CSI2 0 PLL locked

[BIT0] :BACKTOP_EN: Backtop write logic enable.

8. BACKTOP11(0x40A)

[BIT7] :cmd_overflow3: Pipe 3 command FIFO overflow

[BIT6] :cmd_overflow2: Pipe 2 command FIFO overflow

[BIT5] :cmd_overflow1: Pipe 1 command FIFO overflow

[BIT4] :cmd_overflow0: Pipe 0 command FIFO overflow

[BIT3] :LMO_3: Pipe 3 line memory overflow sticky register

[BIT2] :LMO_3: Pipe 2 line memory overflow sticky register

[BIT1] :LMO_3: Pipe 1 line memory overflow sticky register

[BIT0] :LMO_3: Pipe 0 line memory overflow sticky register

备注:该寄存器正常出头的过程中也存在overflow。

9. BACKTOP11(0x42A)

[BIT7] :cmd_overflow7: Pipe 7 command FIFO overflow

[BIT6] :cmd_overflow6: Pipe 6 command FIFO overflow

[BIT5] :cmd_overflow5: Pipe 5 command FIFO overflow

[BIT4] :cmd_overflow4: Pipe 4 command FIFO overflow

[BIT3] :LMO_7: Pipe 7 line memory overflow sticky register

[BIT2] :LMO_6: Pipe 6 line memory overflow sticky register

[BIT1] :LMO_5: Pipe 5 line memory overflow sticky register

[BIT0] :LMO_4: Pipe 4 line memory overflow sticky register

10. BACKTOP25(0x438)

[BIT7] :mem_err7: Pipe 7 line memory error

[BIT6] :mem_err6: Pipe 6 line memory error

[BIT5] :mem_err5: Pipe 5 line memory error

[BIT4] :mem_err4: Pipe 4 line memory error

[BIT3] :mem_err3: Pipe 3 line memory error

[BIT2] :mem_err2: Pipe 2 line memory error

[BIT1] :mem_err1: Pipe 1 line memory error

[BIT0] :mem_err0: Pipe 0 line memory error

11. FSYNC_22(0x4B6)

[BIT7] :FSYNC_LOSS_OF_LOCK: Frame Synchronization Lost Lock

[BIT6] :FSYNC_LOCKED: Frame Synchronization Lock

12. MIPI_TX2(0x902, 0x942, 0x982, 0x9c2)

[BIT7:0] : STATUS: MIPI Tx Status Register

– 0bxxxxxxx0: SYNC mode disabled

– 0bxxxxxxx1: SYNC mode enable

– 0bxxxxxx0x: Video channels not in-sync

– 0bxxxxxx1x: Video channels in-sync

– 0bxxxxx0xx: No loss of video sync

– 0bxxxxx1xx: Video sync lost after last read of this register or reset

备注:正常多个相机拼图同步,该寄存器的值为0x03, 自我感觉的低两位必须置位。

13. MIPI_PHY_19(0x8D0)

[BIT7:4] :csi2_tx1_pkt_cnt: Packer count of CSI2 Controller 1

[BIT3:0] :csi2_tx1_pkt_cnt: Packer count of CSI2 Controller 0

– 0bxxx1: PHY copy 0 FIFO overflow

– 0bxx1x: PHY copy 0 FIFO underflow

– 0bx1xx: PHY copy 1 FIFO overflow

– 0b1xxx: PHY copy 1 FIFO underflow

14. MIPI_PHY_20(0x8D1)

[BIT7:4] :csi2_tx1_pkt_cnt: Packer count of CSI2 Controller 3

[BIT3:0] :csi2_tx1_pkt_cnt: Packer count of CSI2 Controller 2

– 0bxxx1: PHY copy 0 FIFO overflow

– 0bxx1x: PHY copy 0 FIFO underflow

– 0bx1xx: PHY copy 1 FIFO overflow

– 0b1xxx: PHY copy 1 FIFO underflow

15. MIPI_PHY_21(0x8D2)

[BIT7:4] :phy1_pkt_cnt: Packet count of MIPI PHY1

[BIT3:0] :phy0_pkt_cnt: Packet count of MIPI PHY0

– 0bxxx1: PHY copy 0 FIFO overflow

– 0bxx1x: PHY copy 0 FIFO underflow

– 0bx1xx: PHY copy 1 FIFO overflow

– 0b1xxx: PHY copy 1 FIFO underflow

16. MIPI_PHY_22(0x8D3)

[BIT7:4] :phy1_pkt_cnt: Packet count of MIPI PHY1

[BIT3:0] :phy0_pkt_cnt: Packet count of MIPI PHY0

– 0bxxx1: PHY copy 0 FIFO overflow

– 0bxx1x: PHY copy 0 FIFO underflow

– 0bx1xx: PHY copy 1 FIFO overflow

– 0b1xxx: PHY copy 1 FIFO underflow

17. VID_PXL_CRC_ERR_INT(0x45)

备注:正常出图也会存在ecc错误。

  • 调试2wh的2个8m相机(异常绿图),该寄存器值为0x00
  • 调试2wh的2个2m相机(图像正常),该寄存器值为0xc0

18. MIPI_PHY(0x8d0, 0x8d1, 0x8d2, 0x8d3)

备注:正常出图也会存在copy FIFO overflow

  • 调试2wh的2个8m相机(异常绿图),该寄存器为reg[0x8d0]=0x00, reg[0x8d1]=0x00
  • 调试2wh的2个2m相机(图像正常),该寄存器为reg[0x8d0]=0xc0, reg[0x8d1]=0x0b

GMSL1外触发配置

如果外接一个相机,则只配置对应那一路的gpio(0xb08, 0xc08, 0xd08, 0xe08),否则多配或少配都会导致加串配置失败。

1
2
3
4
5
6
7
8
9
10
11
12
0x04 0x29 0x03 0x04 0x61
0x04 0x29 0x03 0x0a 0x63

0x04 0x29 0x04 0xa0 0x08
0x04 0x29 0x04 0xaf 0x1f
0x04 0x29 0x0b 0x08 0x61
#0x04 0x29 0x0c 0x08 0x61
#0x04 0x29 0x0d 0x08 0x61
#0x04 0x29 0x0e 0x08 0x61

/*加串器配置默认gpio都是打开的,所以不用配置寄存器0xf*/
#0x03 0x40 0xf 0x83

调试问题汇总

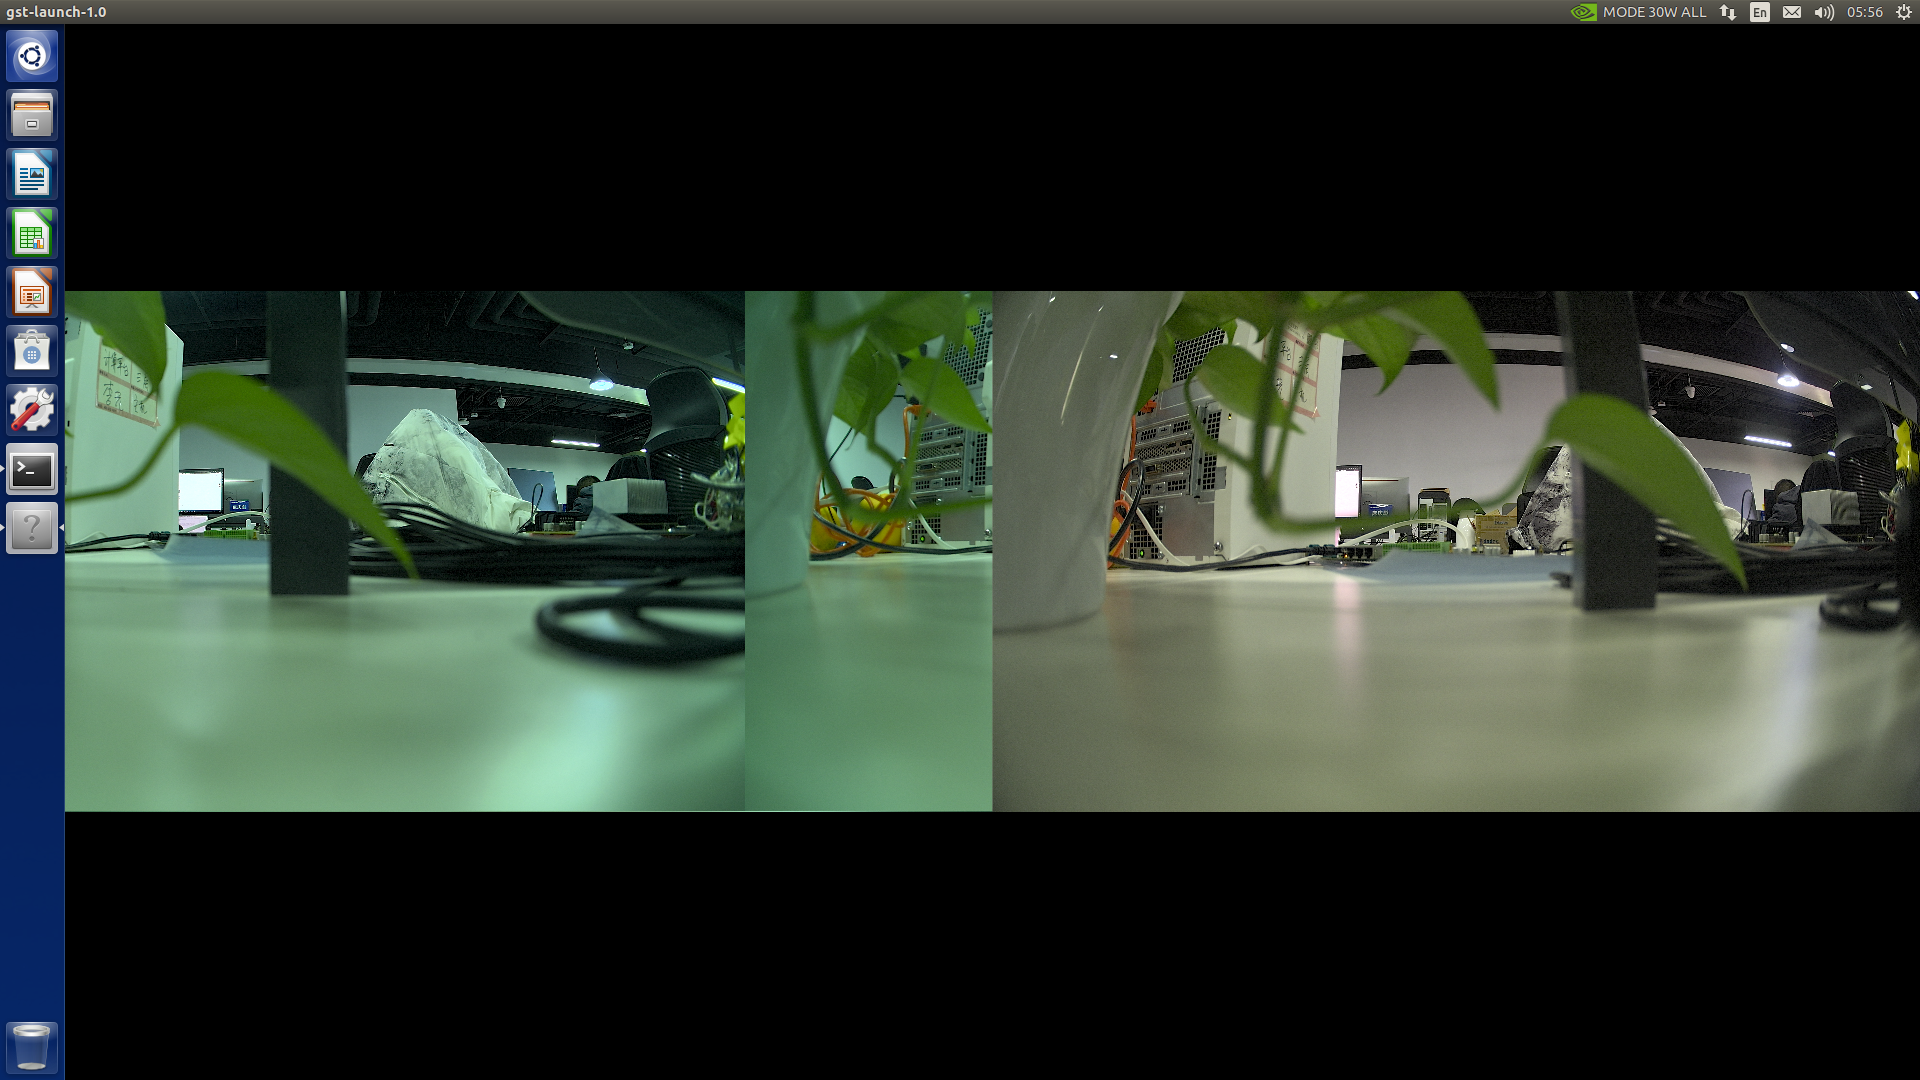
问题1:在调试外部出发2wh模式的时候,GMSLA, GMSLB两路拼图是正常的,但是GMSLC, GMSLD两路拼图,刚开始图像是实时正常,但是几秒钟后图像变为下图的样子并卡死,没有数据流。

外部触发寄存器配置如下:

1
2
3
4
5
6
7
8
9
10
11
12
13
0x04 0x29 0x04 0xa0 0x08
0x04 0x29 0x04 0xa2 0x60
0x04 0x29 0x04 0xaf 0x9f
0x04 0x29 0x03 0x06 0x83
0x04 0x29 0x03 0x3D 0x22

0x04 0x40 0x02 0xbe 0x00
0x00 1
0x04 0x40 0x02 0xbe 0x10
0x04 0x40 0x03 0x18 0x5E
0x00 0.05
0x04 0x40 0x02 0xd5 0x02
0x04 0x40 0x02 0xd3 0x84

解决办法:更新几个寄存器的配置如下,外触发相机正常出图:

1
2
3
4
5
6
7
8
9
10
11
12
13
14
15
0x04 0x29 0x04 0xa0 0x08
0x04 0x29 0x04 0xa2 0x60
0x04 0x29 0x04 0xaf 0x9f
0x04 0x29 0x03 0x06 0x83
0x04 0x29 0x03 0x3D 0x22
0x04 0x29 0x03 0x74 0x22
0x04 0x29 0x03 0xAA 0x22

0x04 0x40 0x02 0xbe 0x00
0x00 1
0x04 0x40 0x02 0xbe 0x10
0x04 0x40 0x03 0x18 0x5E
0x00 0.05
0x04 0x40 0x02 0xd5 0x02
0x04 0x40 0x02 0xd3 0x84

问题2:2个8m相机拼图,有一个相机的图像被拆分并对掉,图像实时

问题3:这个是因为配置0x41a寄存器为0xf0导致的问题

问题3: 分辨率不匹配的问题

原因是分倍率没有配置正确导致,实际分倍率是1280x960, 错误配置成为1288x968

问题4:配置MIPI的速率低导致图像异常

image-20240126112433332

解决办法:调高MIPI每个lane的传输速率,解决问题。

基于max96712格式raw12相机调试

1
2
3
4
5
6
7
8
9
10
11
12
13
14
15
16
17
18
19
20
21
22
23
24
25
26
27
28
29
30
31
32
33
34
35
36
37
38
39
40
41
42
43
44
45
46
47
48
49
50
51
52
53
54
55
56
57
58
59
60
61
62
63
64
65
66
67
68
69
70
71
72
73
74
75
76
77
78
79
80
81
82
83
84
85
86
87
88
89
90
91
92
93
94
95
96
97
98
99
100
101
102
103
104
105
106
107
108
109
110
111
112
113
114
115
116
117
118
119
120
121
122
123
124
125
126
127
0x03 0x28 0x01 0x10
0x00 5
0x04 0x29 0x00 0x13 0x40
0x00 3

0x04 0x29 0x03 0x00 0x81
0x00 0.002
0x04 0x29 0x00 0x01 0xCD
0x00 0.002

0x04 0x29 0x04 0x0B 0x00
0x00 0.002

0x04 0x29 0x08 0xA0 0x04
0x04 0x29 0x08 0xA3 0xE4
0x04 0x29 0x08 0xA4 0xE4
#0x04 0x29 0x08 0xA3 0x1b
#0x04 0x29 0x08 0xA4 0x1b
#0x04 0x29 0x00 0x51 0x02
#0x04 0x29 0x00 0x52 0x01
0x00 0.002

0x04 0x29 0x04 0x14 0x00
0x04 0x29 0x04 0x17 0x00
0x04 0x29 0x09 0x0A 0xC0
0x04 0x29 0x09 0x4A 0xC0
0x04 0x29 0x09 0x8A 0xC0
0x04 0x29 0x09 0xCA 0xC0
0x00 0.002


0x04 0x29 0x09 0x0B 0x07
0x04 0x29 0x09 0x0C 0x00
0x04 0x29 0x09 0x0D 0x2c
0x04 0x29 0x09 0x0E 0x2c
0x04 0x29 0x09 0x0F 0x00
0x04 0x29 0x09 0x10 0x00
0x04 0x29 0x09 0x11 0x01
0x04 0x29 0x09 0x12 0x01
0x04 0x29 0x09 0x2D 0x15
0x00 0.002


0x04 0x29 0x09 0x4B 0x07
0x04 0x29 0x09 0x4C 0x00
0x04 0x29 0x09 0x4D 0x2c
0x04 0x29 0x09 0x4E 0x6c
0x04 0x29 0x09 0x4F 0x00
0x04 0x29 0x09 0x50 0x40
0x04 0x29 0x09 0x51 0x01
0x04 0x29 0x09 0x52 0x41
0x04 0x29 0x09 0x6D 0x15
0x00 0.002


0x04 0x29 0x09 0x8B 0x07
0x04 0x29 0x09 0x8C 0x00
0x04 0x29 0x09 0x8D 0x2c
0x04 0x29 0x09 0x8E 0xac
0x04 0x29 0x09 0x8F 0x00
0x04 0x29 0x09 0x90 0x80
0x04 0x29 0x09 0x91 0x01
0x04 0x29 0x09 0x92 0x81
0x04 0x29 0x09 0xAD 0x15
0x00 0.002


0x04 0x29 0x09 0xCB 0x07
0x04 0x29 0x09 0xCC 0x00
0x04 0x29 0x09 0xCD 0x2c
0x04 0x29 0x09 0xCE 0xec
0x04 0x29 0x09 0xCF 0x00
0x04 0x29 0x09 0xD0 0xC0
0x04 0x29 0x09 0xD1 0x01
0x04 0x29 0x09 0xD2 0xC1
0x04 0x29 0x09 0xED 0x15
0x00 0.002


0x04 0x29 0x08 0xA9 0xC8

0x04 0x29 0x00 0xF0 0x62
0x04 0x29 0x00 0xF1 0xEA
0x04 0x29 0x00 0xF4 0x0F

0x04 0x29 0x04 0x0C 0x00
0x04 0x29 0x04 0x0D 0x00
0x04 0x29 0x04 0x0E 0xAC
0x04 0x29 0x04 0x0F 0xBC
0x04 0x29 0x04 0x10 0xB0
0x00 0.002

0x04 0x29 0x04 0x11 0x48
0x04 0x29 0x04 0x12 0x20
0x00 0.002

0x04 0x29 0x04 0x15 0xf9
0x04 0x29 0x04 0x18 0xf9
0x00 0.002
0x04 0x29 0x04 0x1B 0x39
0x04 0x29 0x04 0x1E 0x39

0x04 0x29 0x00 0x06 0xf2
0x00 0.002

0x04 0x29 0x00 0x04 0x0F
0x04 0x29 0x04 0x0B 0x42
#0x04 0x29 0x04 0x0B 0x62
0x00 0.002

0x03 0x28 0x01 0x1f
0x00 5

#0x04 0x40 0x02 0xD3 0x10
#0x04 0x40 0x03 0x30 0x00
#0x04 0x40 0x03 0x31 0x33
#0x04 0x40 0x03 0x32 0xEE
#0x04 0x40 0x03 0x33 0xE4
#0x04 0x40 0x03 0x08 0x63
#0x04 0x40 0x03 0x11 0x30
#0x04 0x40 0x00 0x02 0x33

0x04 0x40 0x03 0x18 0x6c
#0x04 0x40 0x03 0x16 0x52
0x00 0.05

0xFF

raw格式的图像
image-20240126112433332

max96712的4wh模式图像先后顺序可配

1
2
通过配置

常见采图命令

  • Gstreamer命令采图

    1. 文件存盘

      1
      2
      3
      4
      filename1=video1_$(date +%Y%m%d)_$(date +%H%M%S).yuv
      filename0=video0_$(date +%Y%m%d)_$(date +%H%M%S).yuv
      gst-launch-1.0 v4l2src num-buffers=450 device=/dev/video0 ! "video/x-raw,format=UYVY,width=1280,height=960,framerate=30/1" ! filesink location=${filename0} &
      gst-launch-1.0 v4l2src num-buffers=450 device=/dev/video1 ! "video/x-raw,format=UYVY,width=1280,height=960,framerate=30/1" ! filesink location=${filename1}
    2. hdmi预览

      1
      gst-launch-1.0 v4l2src device=/dev/video$1 ! "video/x-raw,format=UYVY,width=$2,height=$3,framerate=30/1" ! xvimagesink -ev sync=false
  • ffplay播放视频

    1
    ffplay -video_size 7680x1080 -autoexit -pix_fmt yuv422p camera.yuv

调试2个2WH模式的相机问题。

图像异常

1.

UART(RS232) 串口协议

串口应用开发

1. 串口奇偶校验配置

  • 奇校验
    1
    2
    3
    newtio.c_cflag |= PARENB;
    newtio.c_cflag |= PARODD;
    newtio.c_iflag |= (INPCK | ISTRIP);
  • 偶校验
    1
    2
    3
    newtio.c_iflag |= (INPCK | ISTRIP);
    newtio.c_cflag |= PARENB;
    newtio.c_cflag &= ~PARODD;
  • 无校验
    1
    newtio.c_cflag &= ~PARENB;

2. 设置停止位宽

  • 1位停止位
    1
    newtio.c_cflag &=  ~CSTOPB;
  • 2位停止位
    1
    newtio.c_cflag |=  CSTOPB;

C语言实例

1
2
3
4
5
6
7
8
9
10
11
12
13
14
15
16
17
18
19
20
21
22
23
24
25
26
27
28
29
30
31
32
33
34
35
36
37
38
39
40
41
42
43
44
45
46
47
48
49
50
51
52
53
54
55
56
57
58
59
60
61
62
63
64
65
66
67
68
69
70
71
72
73
74
75
76
77
78
79
80
81
82
83
84
85
86
87
88
89
90
91
92
93
94
95
96
97
98
99
100
101
102
103
104
105
106
107
108
109
110
111
112
113
114
115
116
117
118
119
120
121
122
123
124
125
126
127
128
129
130
131
132
133
134
135
136
137
138
139
140
141
142
143
144
145
146
147
148
149
150
151
152
153
154
155
156
157
158
159
160
161
162
163
164
165
166
167
168
169
170
171
172
173
174
175
176
177
178
179
180
181
182
183
184
185
186
187
188
189
190
191
192
193
194
195
196
197
198
199
200
201
202
203
204
205
206
207
208
209
210
211
212
213
214
215
216
217
218
219
220
221
222
223
224
225
226
227
228
229
230
231
232
233
234
235
236
237
238
239
240
241
242
243
244
245
246
247
248
249
250
251
252
253
254
255
256
257
258
259
260
261
262
263
264
265
266
267
268
269
270
271
272
273
274
275
276
277
278
279
280
281
282
283
284
285
286
287
288
289
290
291
292
293
294
295
296
297
298
299
300
301
302
303
304
305
306
307
308
309
310
311
312
313
314
315
316
317
318
319
320
321
322
323
324
325
326
327
328
329
330
331
332
333
334
335
336
337
338
339
340
341
342
343
344
345
346
347
348
349
350
351
352
353
354
355
356
357
358
359
360
361
362
363
364
365
366
367
368
369
370
371
372
373
374
375
376
377
378
379
380
381
382
383
384
385
386
387
388
389
390
391
392
393
394
395
396
397
398
399
400
401
402
403
404
405
406
407
408
409
410
411
412
413
414
415
416
417
418
419
420
421
422
423
424
425
426
427
428
429
430
431
432
433
434
435
436
437
438
439
440
441
442
443
444
445
446
447
448
449
450
451
452
453
454
455
456
457
458
459
460
461
462
463
464
465
466
467
468
469
int UART_Open(int fd,char* port)
{
fd = open(port, O_RDWR|O_NOCTTY|O_NDELAY|O_NONBLOCK);
if (-1 == fd){
clog_report((char *)"Can't Open Serial Port");
cerr_report(Openerr);
return -1;
}

if(fcntl(fd, F_SETFL, 0) < 0){
clog_report((char *)"fcntl failed!\n");
cerr_report(Fcntlerr);
return -1;
} else {
// printf("fcntl=%d\n",fcntl(fd, F_SETFL,0));
}

if(0 == isatty(STDIN_FILENO)){
clog_report((char *)"standard input is not a terminal device\n");
//cerr_report(Nstdindev);
//return -1;
}

return fd;
}

void UART_Close(int fd)
{
close(fd);
}

int UART_Set(int fd,int speed,int flow_ctrl,int databits,int stopbits,int parity)
{

int i;
int speed_arr[] = { B115200, B38400, B19200, B9600, B4800, B2400, B1200, B300,
B38400, B19200, B9600, B4800, B2400, B1200, B300
};
int name_arr[] = {
115200, 38400, 19200, 9600, 4800, 2400, 1200, 300, 38400,
19200, 9600, 4800, 2400, 1200, 300
};
struct termios options;
int arrlen = sizeof(speed_arr) / sizeof(int);

if(tcgetattr( fd,&options) != 0){
perror("SetupSerial 1");
return(-1);
}

for(i= 0;i < arrlen;i++) {
if (speed == name_arr[i]) {
cfsetispeed(&options, speed_arr[i]);
cfsetospeed(&options, speed_arr[i]);
}
}
options.c_cflag |= CLOCAL;
options.c_cflag |= CREAD;
switch(flow_ctrl){
case 0 :
options.c_cflag &= ~CRTSCTS;
break;
case 1 :
options.c_cflag |= CRTSCTS;
break;
case 2 :
options.c_cflag |= IXON | IXOFF | IXANY;
break;
}
options.c_cflag &= ~CSIZE;
switch (databits){
case 5 :
options.c_cflag |= CS5;
break;
case 6 :
options.c_cflag |= CS6;
break;
case 7 :
options.c_cflag |= CS7;
break;
case 8:
options.c_cflag |= CS8;
break;
default:
clog_report((char *)"Unsupported data size\n");
return (-1);
}
switch (parity) {
case 'n':
case 'N':
options.c_cflag &= ~PARENB;
options.c_iflag &= ~INPCK;
break;
case 'o':
case 'O':
options.c_cflag |= (PARODD | PARENB);
options.c_iflag |= INPCK;
break;
case 'e':
case 'E':
options.c_cflag |= PARENB;
options.c_cflag &= ~PARODD;
options.c_iflag |= INPCK;
break;
case 's':
case 'S':
options.c_cflag &= ~PARENB;
options.c_cflag &= ~CSTOPB;
break;
default:
clog_report((char *)"Unsupported parity");
return (-1);
}
switch (stopbits){
case 1:
options.c_cflag &= ~CSTOPB;
break;
case 2:
options.c_cflag |= CSTOPB;
break;
default:
clog_report((char *)"Unsupported stop bits");
return (-1);
}
options.c_oflag &= ~OPOST;
options.c_cc[VTIME] = 0;
options.c_cc[VMIN] = 0;

tcflush(fd,TCIFLUSH);

if (tcsetattr(fd,TCSANOW,&options) != 0)
{
perror("com set error!/n");
return -1;
}
return 1;
}


int UART_Init(int fd, int speed,int flow_ctrlint ,int databits,int stopbits,char parity)
{
if (-1 == UART_Set(fd,speed,flow_ctrlint,databits,stopbits,parity)) {
cerr_report(Initerr);
return -1;
} else {
return 1;
}
}

int UART_Recv(int fd, char *rcv_buf,int data_len)
{
int len = 0;
fd_set fs_read;

struct timeval time;

FD_ZERO(&fs_read);
FD_SET(fd,&fs_read);

time.tv_sec = 0;
time.tv_usec = 300000;

select(fd+1,&fs_read,NULL,NULL,&time);

if(FD_ISSET(fd, &fs_read)){
len = read(fd,rcv_buf,data_len);
return len;
} else {
cerr_report(Recverr);
return -1;
}
}

int UART_Send(int fd, char *send_buf,int data_len)
{
int ret;

ret = write(fd,send_buf,data_len);
if (data_len == ret ){
return ret;
} else {
tcflush(fd,TCOFLUSH);
cerr_report(Senderr);
return -1;
}
}

int uart3_loopback(void* arg, int *failcnt)
{
int fd_tx = -1;
int ret, i;
char snd_buf[512] = {0};
char rcv_buf[512] = {0};
char cmd[1024] = {0};
int data_len = 0;
struct uart_data data = *(struct uart_data *)arg;

for(i=0; i<99; i++)
{
switch(i%2) {
case 0:
snd_buf[i] = 'c';
break;
case 1:
snd_buf[i] = '5';
break;
}
}
snd_buf[i] = '\n';

fd_tx = UART_Open(fd_tx, data.uart_tx);
if(-1 == fd_tx){
sprintf(cmd, "open %s error", data.uart_tx);
clog_report(cmd);
(*failcnt)++;
return -1;
}

ret = UART_Init(fd_tx,data.baudrate,1,8,1,'N');
if (-1 == fd_tx){
sprintf(cmd, "Set %s Port Error", data.uart_tx);
clog_report(cmd);
(*failcnt)++;
return -1;
}
data_len = strlen(snd_buf);

memset(rcv_buf,0,sizeof(rcv_buf));
tcflush(fd_tx,TCIOFLUSH);

ret = UART_Send(fd_tx,snd_buf, data_len);
if(-1 == ret){
sprintf(cmd, "%s(rs422) send failed!", data.uart_tx);
clog_report(cmd);
(*failcnt)++;
return -1;
} else {
sprintf(cmd, "port:%s(rs422)[@%ld] send data: %s", data.uart_tx, data.baudrate, snd_buf);
clog_report(cmd);
}

usleep(600000);

ret = UART_Recv(fd_tx, rcv_buf, data_len);
if( ret > 0){
sprintf(cmd, "port:%s(rs422)[@%ld] receive data: %s", data.uart_tx, data.baudrate, rcv_buf);
clog_report(cmd);
}
tcflush(fd_tx,TCIOFLUSH);

ret = strncmp(snd_buf, rcv_buf, data_len);
if (ret == 0) {
sprintf(cmd, "Test[@%ld] %s(rs422) ok ...", data.baudrate, data.uart_tx);
clog_report(cmd);
} else {
sprintf(cmd, "Test[@%ld] %s(rs422) failed ...", data.baudrate, data.uart_tx);
clog_report(cmd);
(*failcnt)++;
}

UART_Close(fd_tx);

return 0;
}

int uart1_uart2_txrx(void* arg, int *failcnt)
{
int fd_tx = -1;
int fd_rx = -1;
int ret;
char snd_buf[512] = {0};
char rcv_buf[512] = {0};
char cmd[1024] = {0};
int data_len = 0;
unsigned long i;
struct uart_data data = *(struct uart_data *)arg;

for(i=0; i<99; i++)
{
switch(i%2) {
case 0:
snd_buf[i] = 'c';
break;
case 1:
snd_buf[i] = '5';
break;
}
}
snd_buf[i] = '\n';

fd_tx = UART_Open(fd_tx, data.uart_tx);
if(-1 == fd_tx){
sprintf(cmd, "open %s error", data.uart_tx);
clog_report(cmd);
(*failcnt)++;
return -1;
}
ret = UART_Init(fd_tx,data.baudrate,1,8,1,'N');
if (-1 == fd_tx){
sprintf(cmd, "Set %s Port Error", data.uart_tx);
clog_report(cmd);
(*failcnt)++;
return -1;
}

fd_rx = UART_Open(fd_rx,data.uart_rx);
if(-1 == fd_rx){
sprintf(cmd, "open %s error", data.uart_rx);
clog_report(cmd);
(*failcnt)++;
return -1;
}
ret = UART_Init(fd_rx,data.baudrate,1,8,1,'N');
if (-1 == fd_rx){
sprintf(cmd, "Set %s Port Error", data.uart_rx);
clog_report(cmd);
(*failcnt)++;
return -1;
}
data_len = strlen(snd_buf);

memset(rcv_buf,0,sizeof(rcv_buf));
tcflush(fd_tx,TCIOFLUSH);

ret = UART_Send(fd_tx, snd_buf, data_len);
if(-1 == ret){
sprintf(cmd, "%s write error!", data.uart_tx);
clog_report(cmd);
(*failcnt)++;
return -1;
} else {
sprintf(cmd, "port:%s(rs232a)[@%ld] send data: %s", data.uart_tx, data.baudrate, snd_buf);
clog_report(cmd);
}
usleep(600000);

ret = UART_Recv(fd_rx, rcv_buf,data_len);
if( ret > 0){
sprintf(cmd, "port:%s(rs232b)[@%ld] receive data: %s", data.uart_rx, data.baudrate, rcv_buf);
clog_report(cmd);
}
tcflush(fd_rx,TCIOFLUSH);

ret = strncmp(snd_buf, rcv_buf, data_len);
if (ret == 0) {
sprintf(cmd, "Test(@%ld) %s(rs232a) ==> %s(rs232b) ok ...", data.baudrate, data.uart_tx, data.uart_rx);
clog_report(cmd);
} else {
sprintf(cmd, "Test(@%ld) %s(rs232a) ==> %s(rs232b) failed ...", data.baudrate, data.uart_tx, data.uart_rx);
clog_report(cmd);
(*failcnt)++;
return -1;
}

//loopback
memset(rcv_buf,0,sizeof(rcv_buf));
tcflush(fd_rx,TCIOFLUSH);

ret = UART_Send(fd_rx, snd_buf, data_len);
if(-1 == ret){
sprintf(cmd, "write back to [%s] error!\n", data.uart_rx);
clog_report(cmd);
(*failcnt)++;
return -1;
} else {
sprintf(cmd, "port:%s(rs232b)[@%ld] send data: %s\n", data.uart_rx, data.baudrate, snd_buf);
clog_report(cmd);
}

usleep(600000);

ret = UART_Recv(fd_tx, rcv_buf, data_len);
if(ret > 0){
sprintf(cmd, "port:%s(rs232a)[@%ld] receive data: %s\n", data.uart_tx, data.baudrate, rcv_buf);
clog_report(cmd);
}
tcflush(fd_tx,TCIOFLUSH);

ret = strncmp(snd_buf, rcv_buf, data_len);
if (ret == 0) {
sprintf(cmd, "Test(@%ld) %s(rs232b) ==> %s(rs232a) ok ...", data.baudrate, data.uart_rx, data.uart_tx);
clog_report(cmd);
} else {
sprintf(cmd, "Test(@%ld) %s(rs232b) ==> %s(rs232a) failed ...", data.baudrate, data.uart_rx, data.uart_tx);
clog_report(cmd);
(*failcnt)++;
return -1;
}

UART_Close(fd_tx);
UART_Close(fd_rx);

return 0;
}

int main(int argc, const char *argv[])
{
int ret;
struct uart_data *uart_data_test = NULL;
int baudrate[3] = {460800, 115200, 9600};
char result[20] = {0};
int i, failcnt = 0;
int cnt = atoi(argv[1]);
int times = 1;
char msg[100] = {0};
struct timeval start, end;
double maxtime=0,mintime=1000000,tms=0,full_time=0;

ret = clog_init((char *)"UART_001", 2);
if (ret != 0)
{
printf("test_uart log_init failed\n");
return 0;
}

uart_data_test = (struct uart_data *)malloc(sizeof(struct uart_data));
while(cnt) {
clog_report((char *)"-------------------------------------------------------------------");
sprintf(msg, "重复测试总轮数: %d 当前轮数: %d", atoi(argv[1]), times++);
clog_report(msg);
cnt--;

gettimeofday(&start, NULL);
for (i=0; i < 3; i++) {
//memset(uart_data_test->uart_tx, 0, 64);
//memset(uart_data_test->uart_rx, 0, 64);
//strcpy(uart_data_test->uart_tx, "/dev/ttyTHS0");
//strcpy(uart_data_test->uart_rx, "/dev/ttyTHS1");
//uart_data_test->baudrate = baudrate[i];

//ret = uart1_uart2_txrx((void*)uart_data_test, &failcnt);
//if (ret)
// goto finish;

memset(uart_data_test->uart_tx, 0, 64);
strcpy(uart_data_test->uart_tx, "/dev/ttyTHS4");
uart_data_test->baudrate = baudrate[i];

ret = uart3_loopback((void *)uart_data_test, &failcnt);
if (ret)
goto finish;
}
gettimeofday(&end, NULL);
tms = ((end.tv_sec - start.tv_sec) * 1000000 + (end.tv_usec - start.tv_usec)) / 1000;

sprintf(msg, "测试耗时: %lf ms", tms);
clog_report(msg);
maxtime=std::max(maxtime,tms);
mintime=std::min(mintime,tms);
full_time+=tms;
};

finish:
sprintf(msg, "最长测试用时: %lf 最短测试用时: %lf 总测试用时: %lf", maxtime, mintime, full_time);
clog_report(msg);
sprintf(msg, "重复测试总轮数: %d 成功轮数: %d 失败轮数: %d", atoi(argv[1]), atoi(argv[1]) - cnt - failcnt, failcnt);
clog_report(msg);
clog_report((char *)"-------------------------------------------------------------------");
free(uart_data_test);

if(failcnt)
sprintf(result, "failure");
else
sprintf(result, "pass");

clog_done(result);

return Success;
}

python实例

1
2
3
4
5
6
7
8
9
10
11
12
13
14
15
16
17
18
19
20
21
22
23
24
25
26
27
28
29
30
31
32
33
34
35
36
37
38
39
40
41
42
43
44
45
46
47
48
49
50
51
52
53
54
import subprocess
import os
import serial
import time


#打开串口
ser1 = serial.Serial('/dev/ttyS1', 9600, timeout=1)
ser2 = serial.Serial('/dev/ttyS2', 9600, timeout=1)

#发送数据
def send_data(ser, data):
ser.write(data.encode())

#接收数据
def receive_data(ser):
while True:
data = ser.readline().decode().strip()
if data:
return data

#统计中断数
#ttys1Result1 = subprocess.check_output("cat /proc/interrupts | grep ttyS1 | awk '{print $2}'", shell=True)
#ttys2Result1 = subprocess.check_output("cat /proc/interrupts | grep ttyS2 | awk '{print $2}'", shell=True)
#print(ttys1Result1.decode())
#print(ttys2Result1.decode())

#发送开始时间
start_time = time.time()
#9600
send_data(ser1, 'c5c5'*240)
rcvData = receive_data(ser2)
if rcvData == 'c5c5'*240:
print("测试通过")
else:
print("测试失败")

#发送结束时间
end_time = time.time()

#统计结束后的中断数
#ttys1Result2 = subprocess.check_output("cat /proc/interrupts | grep ttyS1 | awk '{print $2}'", shell=True)
#ttys2Result2 = subprocess.check_output("cat /proc/interrupts | grep ttyS2 | awk '{print $2}'", shell=True)
#print(ttys1Result2.decode())
#print(ttys2Result2.decode())
#result1=int(ttys1Result2) - int(ttys1Result1)
#print(result1)
#result2=int(ttys2Result2) - int(ttys2Result1)
#print(result2)
#print(f"发送数据到的时间: {end_time - start_time}秒")

#关闭串口
ser1.close()
ser2.close()

shell中特殊符的使用

参考: https://www.cnblogs.com/du-z/p/15322745.html

示例:file=”/dir1/dir2/dir3/my.file.txt”

“#”: 表示最短匹配

1
${file#*/}:删掉第一个/ 及其左边的字符串:dir1/dir2/dir3/my.file.txt

“##”: 表示最长匹配

1
${file##*/}:删掉最后一个/  及其左边的字符串:my.file.txt

“%”: 表示从右开始的第一个匹配

1
${file%/*}:删掉最后一个 /  及其右边的字符串:/dir1/dir2/dir3

通过从左到右的某个字节数开始截取,截取多少个字节

1
${file:5:5}:提取第5 个字节右边的连续5个字节:/dir2

计算变量值的长度

1
2
echo ${#file} 
结果:27

变量值中的字符串替换

1
2
${file/dir/path}:将第一个dir 替换为path:/path1/dir2/dir3/my.file.txt
${file//dir/path}:将全部dir 替换为path:/path1/path2/path3/my.file.txt

反向截取字符的方法

rev命令是将输入行反转

1
2
echo "2024-03-13_144312-1302944-gpio_001_pass.tar.gz" | rev | awk -F'-' '{print $1}' | rev
结果:gpio_001_pass.tar.gz

实现同名排序(sort)

1
2
3
4
5
6
7
8
9
10
11
12
13
find -name "*failure*" | rev | awk -F'-' '{print $1}' | rev | awk -F'_' '{print $1"_"$2}' | sort
结果如下:
hdmi_121
hdmi_121
hdmi_121
hdmi_121
hdmi_121
hdmi_121
rtc_004
rtc_004
vpu_018
vpu_018
vpu_018

统计同名的个数(uniq -c)

1
2
3
4
5
find -name "*failure*" | rev | awk -F'-' '{print $1}' | rev | awk -F'_' '{print $1"_"$2}' | sort | uniq -c
统计结果:
110 hdmi_121
2 rtc_004
3 vpu_018

安装can测试工具

1
sudo apt-get install can-utils

can测试流程

1. 加载虚拟can模块

1
sudo modprobe vcan

2. 加载vcan0网卡

1
sudo ip link add dev vcan0 type vcan

3. 可以查到当前can网络 can0 can1,包括收发包数量、是否有错误等等

1
ifconfig -a

4. 设置can0的波特率为800kbps,CAN网络波特率最大值为1Mbps

1
ip link set can0 type can --help 4.ip link set can0 up type can bitrate 800000

5. 设置回环模式,自发自收,用于测试是硬件是否正常,loopback不一定支持

1
ip link set can0 up type can bitrate 800000 loopback on

6. 关闭can0 网络

1
ip link set can0 down

7. 发送默认ID为0x1的can标准帧,数据为0x11 22 33 44 55 66 77 88 每次最大8个byte

1
cansend can0 0x11 0x22 0x33 0x44 0x55 0x66 0x77 0x88

8. 发送数据包

1
cansend can0 -i 0x800 0x11 0x22 0x33 0x44 0x55 0x66 0x77 0x88 -e -e 表示扩展帧,CAN_ID最大29bit,标准帧CAN_ID最大11bit  -i表示CAN_ID

9. 发送20个包

1
cansend can0 -i 0x02 0x11 0x12 --loop=20 --loop 表示发送20个包

10. 接收CAN0数据

1
candump can0 接收CAN0数据